

How To Repair A Leaky Laundry Shut Off Valve
How to Fix a Leaking Shutoff Valve
Set up a leaking shutoff valve and save yourself the cost of a visit from the plumber.
![]() Time
Time
An hour or less
![]() Complexity
Complexity
Beginner
![]() Price
Price
Less than $20
Introduction
This quick DIY fix for a leaky water shutoff valve is something even a novice tin can handle. Follow our how-to steps and photos for consummate instructions.
Tools Required
The plumbing supply shutoff valves behind toilets or under sinks can go for years without being turned off and and so reopened again. That inactivity tin can cause the neoprene washers to become either breakable or crusted up with mineral deposits, and they lose their ability to seal leaks. Fixing the valve is usually pretty simple if yous know what to do.
Project pace-by-step (2)
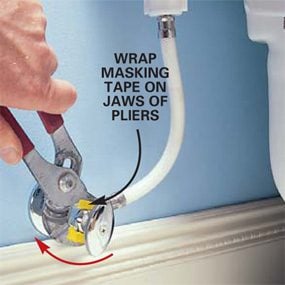
Stride one
Tighten the Packing Nut
- Tighten the packing nut on the toilet shutoff valve one-8th plough clockwise to try to seal a leak around the nut.
- Pro tip: Wrap material or masking tape on the plier's jaws to protect the nut's end. Use light, steady pressure so you don't damage the water lines.
Stride ii
Disassemble the Shutoff Valve
- Detach the shutoff valve—leaving the toilet and supply lines intact.
- Clean the washers with a cloth.
- Flex the neoprene to effort to get it supple again.
- Pro tip: Avoid gumming upward the inside of the shutoff valve; don't use whatsoever pipe dope or plastic tape on the valve stem'southward threads.
- Turn off the house water main before taking apart the toilet shutoff valve.
- Note: Properly sized replacement washers for the shutoff valve are bachelor from plumbing supply houses and improve hardware stores that stock a large inventory of repair parts.
- If this step doesn't stop the leak, you'll need to supercede the whole valve.

![]()

Source: https://www.familyhandyman.com/project/how-to-fix-a-leaking-shutoff-valve/
Posted by: hernandezbourponshave.blogspot.com
0 Response to "How To Repair A Leaky Laundry Shut Off Valve"
Post a Comment